Service Based Applications
The Client Credentials grant is used when applications request an access token to access their own resources, not on behalf of a user.
The Client Credential flow is initiated by app, and calls the /token-srv/token endpoint, it returns the access_token and **expires\_in**
The access_token is a JSON Web Token (JWT) and contains various attributes - referred to as Claims - regarding the user, such as the user's name, email address, profile picture etc. The access_token can be decoded to extract the claims and you are free to use these inside of your application, to display a user's name and profile image for example.
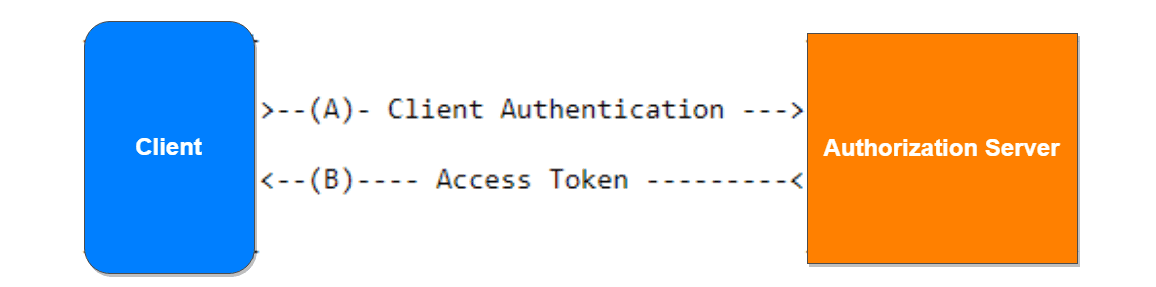
The client authenticates with the authorization server and requests an access token from the token endpoint.
The authorization server authenticates the client, and if valid, issues an access token.
How to implement the Client Credentials Grant
Register your App
The first thing you need to do is to create a new client in cidaas. A cidaas client maps to your application and allows it to use cidaas for authentication.
Navigate to the cidaas dashboard and click on the Apps menu option on the left. Create a new App by clicking on the Create App button.
The Create App page will open, allowing you to enter the name of your new application. Choose Webapplication app type and click save button.
Prerequisites
To start using the Client Credentials Grant, the following must apply:
You have configured a Non Interactive Client at the cidaas Dashboard, for your 3 application.
You have configured an API at the cidaas Dashboard, for your API.
You have authorized the Non Interactive Client to access your API.
Ask for a Token
Call the access token endpoint directly by passing the client credentials
curl --request POST \
  --url 'https:///token-srv/token' \
  --header 'content-type: application/json' \
  --data '
  {
  "grant_type":"client_credentials",
  "client_id": "YOUR_CLIENT_ID",
  "client_secret": "YOUR_CLIENT_SECRET"
  }'
Request Parameters
The access token request will contain the following parameters.
grant_type: This must be client_credentials.
client_id: Your application's Client ID. You can find this value at the App Settings tab of the Non Interactive Client.
client_secret: Your application's Client Secret. You can find this value at the App Settings tab of the Non Interactive Client.
The response from /token-srv/token' contains an access_token, refresh_token, id_token(only for openid scope), expires(86400 seconds, which means 1 days) and token_type values, for example:
{
  "access_token":"eyJz93a...k4laUWw",
  "token_type":"Bearer",
  "expires_in":86400
}
The access_token will be a JSON Web Token (JWT) containing information about the user. You can extract both of these values from the URL using basic string manipulation techniques in whatever programming language you are using.
As mentioned, the access_token is a JWT and you will need to decode this token in order to read the claims (i.e. attributes) of the user.
Once the JWT is decoded, you can extract the information about the user from the Payload of the access_token. This is a JSON structure and will contain the claims (attributes) about the user as well as some other metadata.
The access_token Payload
An example payload for an access_token may look something like this:
{
  "sub": "2c68b74b-b8a3-4f2d-b8d5-b5c27d9db9c9",
  "role": "USER,SITE_A_USER",
  "auth_time": 1486898362350,
  "iss": "http://issuerdomain",
  "exp": 1486984762000,
  "iat": 1486898362350,
  "uuid": "c2fee8e2-0b87-49d6-8eac-fc110fb9368b",
  "exp_in": 86400
}
The payload above contains the following claims:
| Parameter | Description |
|---|---|
| sub | The unique identifier of the user. This is guaranteed to be unique per user and will be in the format (identity provider)(unique id in the provider), e.g. 2c68b74b-b8a3-4f2d-b8d5-b5c27d9db9c9. |
| role | Comma separated string value , contains roles of the user. |
| auth_time | Hold the value when the authorization happens. |
| iss | The issuer. A case-sensitive string or URI that uniquely identifies the party that issued the JWT. For an cidaas issued access_token, this will be the URL of your cidaas tenant. |
| exp | The expiration time. holds the milliseconds. |
| iat | The issued at time. holds the milliseconds. |
| uuid | Unique id for the token |
| exp_in | The expires in seconds. |
Verify the Token
When an API receives a request with a bearer access token, the first thing to do is to validate the token. This consists of a series of steps, and if any of these fails then the request must be rejected. for more information.
This document lists all the validations that your API should perform:
Check that the JWT is well formed
Check the signature
Validate the standard claims
Check the Client permissions (scopes)
Parse the JWT
First, the API needs to parse the JSON Web Token (JWT) to make sure it's well formed. If this fails the token is considered invalid and the request must be rejected.
A well formed JWT, consists of three strings separated by dots (.): the header, the payload and the signature. Typically it looks like the following

The header and the payload are Base64Url encoded. The signature is created using these two, a secret and the hashing algorithm being used (as specified in the header: HMAC, SHA256 or RSA).
Check the Signature Algorithm
The API needs to check if the algorithm, as specified by the JWT header (property alg), matches the one expected by the API. If not, the token is considered invalid and the request must be rejected.
In this case the mismatch might be due to mistake (it is common that the tokens are signed using the HS256 signing algorithm, but your API is configured for RS256, or vice versa), but it could also be due to an attack, hence the request has to be rejected.
Validate the Claims
Once the API verifies the token's signature, the next step is to validate the standard claims of the token's payload. The following validations need to be made:
Token expiration: The current date/time must be before the expiration date/time listed in the exp claim (which is a Unix timestamp). If not, the request must be rejected.
Token issuer: The iss claim denotes the issuer of the JWT. The value must match the one configured in your API. For JWTs issued by cidaas, iss holds your cidaas domain with a https:// prefix and a / suffix: https://someAPI.com/
Check the Permissions
By now you have verified that the JWT is valid. The last step is to verify that the client has the permissions required to access the protected resources.
To do so, you need to check the scopes of the decoded JWT. This claim is part of the payload and it is a space-separated list of strings.
To check the permissions granted to the client, you need to check the contents of the scope.
For example, a user management API might provide three endpoints to read, create or delete a user record: /create, /read and /delete. We have configured this API, so each endpoint requires a specific permission (or scope):
The read:users scope provides access to the /read endpoint.
The create:users scope provides access to the /create endpoint.
The delete:users scope provides access to the /delete endpoint.
If a request requests to access the /create endpoint, but the scope claim does NOT include the value create:users, then the API should reject the request with 403 Forbidden.