Web Application
The Authorization Code grant type is used by confidential and public clients to exchange an authorization code for an access token.
After the user returns to the client via the redirect URL, the application will get the authorization code from the URL and use it to request an access token.
The Authorization Code flow is initiated by redirecting the user in the web browser to the cidaas /authz endpoint. cidaas will then display the cidaas login page, allowing the user to enter their credentials or alternatively sign in with any other configured Identity Provider.
After the user has authenticated, cidaas will redirect the browser back to the Redirect URI (also called Callback URL), passing along an authorization_code parameter in the query string of the Callback URL. This code can then be exchanged for an access_token by making a request to the /token-srv/token endpoint.
The access_token is a JSON Web Token (JWT) and contains various attributes - referred to as Claims - regarding the user, such as the user's name, email address, profile picture etc. The access_token can be decoded to extract the claims and you are free to use these inside of your application, to display a user's name and profile image for example.
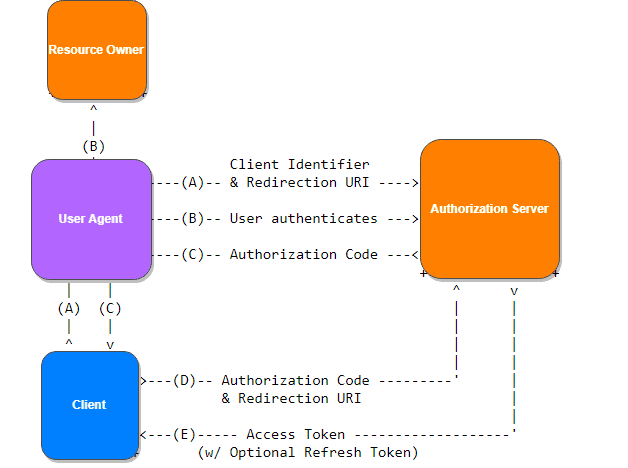
The Client initiates the flow and redirects the user to the Authorization Server.
The user authenticates.
The Authorization Server redirects to the redirect_uri with an authorization_code in the query string.
The Client sends the authorization_code together with the redirect_uri and the Client Id/Client Secret to the Authorization Server.
The Authorization Server validates this information and returns an access_token.
Execute an Authorization Code Grant Flow
Register your App
The first thing you need to do is to create a new client in cidaas. A cidaas client maps to your application and allows it to use cidaas for authentication.
Navigate to the cidaas dashboard and click on the Apps menu option on the left. Create a new App by clicking on the Create App button.
The Create App page will open, allowing you to enter the name of your new application. Choose Webapplication app type and click save button.
1. Get the User's Authorization
To begin an Authorization Code flow, your web application should first send the user to the authorization URL:
https:///authz-srv/authz/?
    response_type=code&
    client_id=YOUR_CLIENT_D&
    redirect_uri=https://your_app/callback&
    state=YOUR_OPAQUE_VALUE
Request Parameters
The authz request will contain the following parameters.
response_type: The response type specifies the Grant Type you want to use. This can be either code or token. For mobile applications using the Implicit Grant Flow this must be set to token
client_id: The Client ID of the Client you registered in cidaas. This can be found on the Settings tab of your Client in the cidaas Dashboard.
state: The state parameter will be sent back should be used for XSRF and contextual information (like a return url). This is used to prevent CSRF attacks
redirect_uri: The URL to which cidaas will redirect the browser after authorization has been granted by the user. The Authorization Code will be available in the code URL parameter. This URL must be specified as a valid callback URL under your Client's Settings.
For example:
https:///authz-srv/authz/?&response_type=code&client_id=your client id&redirect_uri=https://your_app/callback
2. Obtain access token by Authorization Code
After the user has authenticated, cidaas will call back to the URL specified in the redirecturi query string parameter which was passed to the /authz endpoint. When calling back to this URL, cidaas will pass along the code in the query string of the URL, e.g.
You application will need to handle the request to this callback URL, extract the access_code from the code query string parameter and call the token-srv/token endpoint of the cidaas Authentication API in order to exchange the access_code for the access_token:
curl --request POST \
--url 'https:///token-srv/token' \
--header 'content-type: application/json' \
--data '
{
"grant_type":"authorization_code",
"client_id": "YOUR_CLIENT_ID",
"client_secret": "YOUR_CLIENT_SECRET",
"code": "YOUR_AUTHORIZATION_CODE",
"redirect_uri": "https://your_app/callback"
}'
Request Parameters
The access_token request will contain the following parameters.
grant_type: This must be authorization_code.
client_id: Your application's Client ID.
client_secret: Your application's Client Secret.
code: The Authorization Code received from the initial authorize call.
redirect_uri: The URL must match exactly the redirect_uri passed to /authorize.
The response from /oauth2-login/oauth2/token contains an access_token, refresh_token, id_token(only for openid scope), scope, expires_in and token_type values (and also potentially a refresh_token), for example:
{
  "access_token": "eyJz93a...k4laUWw",
  "refresh_token": "GEbRxBN...edjnXbL",
  "id_token": "eyJ0XAi...4faeEoQ",
  "token_type": "Bearer"
}
The access_token will be a JSON Web Token (JWT) containing information about the user. You can extract both of these values from the URL using basic string manipulation techniques in whatever programming language you are using.
As mentioned, the access_token is a JWT and you will need to decode this token in order to read the claims (i.e. attributes) of the user.
Once the JWT is decoded, you can extract the information about the user from the Payload of the access_token. This is a JSON structure and will contain the claims (attributes) about the user as well as some other metadata.
The access_token Payload
An example payload for an access_token may look something like this:
{
{
  "sid": "a76f92c2-306f-4174-b6a1-48bed1fe4a36",
  "sub": "cc28a557-ce0d-4896-9580-49639cbde8d5",
  "isub": "400da8f2-a877-4c18-b864-2123efdda6f8",
  "aud": "4d5e6e20-9347-4255-9790-5b7196843103",
  "iat": 1528783548,
  "auth_time": 1528782823,
  "iss": "https://issuerdomain",
  "jti": "48f2ff7f-5278-4bde-9af3-80712f035ed6",
  "scopes": [
    "openid",
    "profile",
    "email",
    "address",
  ],
  "roles": [
    "USER"
  ],
  "groups": [
    {
      "groupId": "CIDAAS_ADMINS",
      "path": "/CIDAAS_ADMINS/",
      "roles": [
        "SECONDARY_ADMIN"
      ]
    }
  ],
  "exp": 1528869948,
  "email": "davidjhonson@gmail.com",
  "given_name": "test"
}
}
The payload above contains the following claims:
| Parameter | Description |
|---|---|
| sub | The unique identifier of the user. This is guaranteed to be unique per user and will be in the format (identity provider)(unique id in the provider), e.g. 2c68b74b-b8a3-4f2d-b8d5-b5c27d9db9c9. |
| role | array of string value , contains roles of the user. |
| auth_time | Hold the value when the authorization happens. |
| iss | The issuer. A case-sensitive string or URI that uniquely identifies the party that issued the JWT. For an cidaas issued access_token, this will be the URL of your cidaas tenant. |
| exp | The expiration time. holds the milliseconds. |
| iat | The issued at time. holds the milliseconds. |
| exp_in | The expires in seconds. |
3. Call the API
Once the access_token has been obtained it can be used to make calls to the API by passing it as a Bearer Token in the Authorization header of the HTTP request:
curl --request GET \
  --url https:///api \
  --header 'authorization: Bearer ACCESS_TOKEN' \
  --header 'content-type: application/json'
4. Verify the Token
Once your API receives a request with a Bearer access_token, the first thing to do is to validate the token. This consists of a series of steps, and if any of these fails then the request must be rejected. for more information
5. When to use the Authorization Code Flow
The Authorization Code flow is best used in web and mobile apps. Since the Authorization Code grant has the extra step of exchanging the authorization code for the access token, it provides an additional layer of security not present in the Implicit grant type.
If you’re using the Authorization Code flow in a mobile app, or any other type of application that can’t store a client secret, then you should also use the PKCE extension, which provides protections against other attacks where the authorization code may be intercepted.
The code exchange step ensures that an attacker isn’t able to intercept the access token, since the access token is always sent via a secure backchannel between the application and the OAuth server.